
In this article I will use Less to demonstrate how to build and deploy a Food Delivery system to AWS using the Choreography Coordination Microservices Pattern. Join me to learn how Less makes complex, fault tolerant, event-driven microservices easily accessible to Engineers of all experience levels with no DevOps.
Implementation is in Javascript with Python, Go, and Rust examples coming soon.
I really enjoyed reading Naresh Waswani's article, Microservices Workflows: Choreography Coordination Pattern, where he explains very well the benefits, drawbacks, and architectural patterns of these highly responsive, scalable, and fault tolerant systems using a Food Order & Delivery system as an example.
Although the benefits are apparent, building such a system in practice is difficult to pull off. Things like "over-engineered" and "pre-mature optimization" come to mind immediately, not to mention the DevOps costs and extreme complexity that sets a high bar for Junior Engineers.
Just imagine for a second — someone wants to understand how the overall workflow is implemented and what are the possible alternate paths and error conditions within the workflow. It would be simply crazy :)
- Naresh Waswani
I would love to express how beautiful I find both Waswani's system and article to be! I've researched these systems in thorough detail for almost a decade and appreciate how he has put this work together. I also agree with his fear about things getting quickly out of hand - at least depending on the tools used to implement the system.
The Microservices Workflows: Choreography Coordination Pattern article is unopinionated about any implementation details. In this article I will demonstrate how such a system can be implemented and deployed to AWS using Less. I truly do not believe that there is a faster or easier way to reap the benefits of such a system. Less also gets the drawbacks summarized in Waswani's article under control, does not require DevOps, and is easily accessible to Junior Engineers.
Let's follow the steps of the original article in order to create our Food Order System.
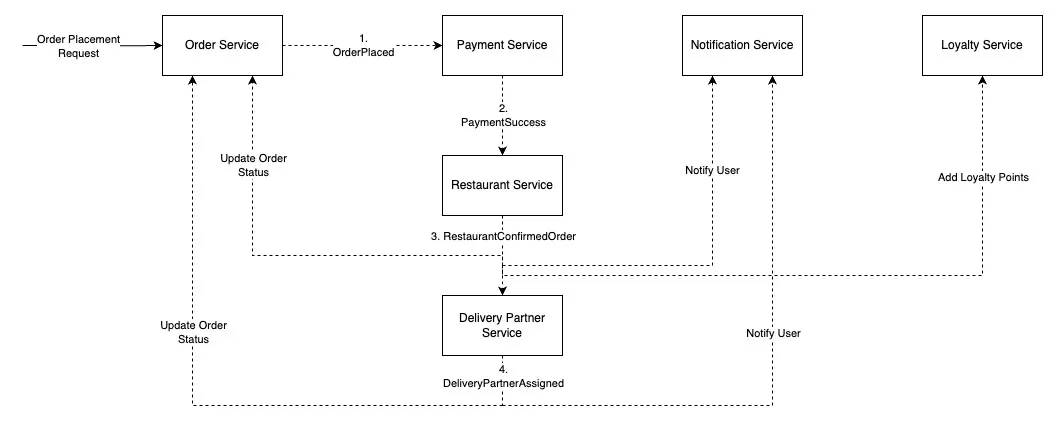
Here's what we will be building:
Create your Less project
Let's start by creating our project folder.
mkdir food_delivery_system
cd food_delivery_system
1. Create an order in the Order microservice.
In order to get started we will create a POST /orders route which will create an order with an id.
Let's create our orders API with our POST /orders route.
- Node.js
- Python
- Go
- Rust
less-cli create route --name orders --path /orders --verb post --language js
# File created: less/apis/orders/orders/post.js
exports.process = async (request, response) => {
  console.log('[ORDER SERVICE] Creating order');
  response.statusCode = 201;
  return response;
};
Python examples will be added soon.
Go examples will be added soon.
Rust examples will be added soon.
For simplicity, we'll just pretend to create an order by generating a UUID for the order's ID.
- Node.js
- Python
- Go
- Rust
- npm
- yarn
npm i uuid
yarn add uuid
const { v4: uuid } = require('uuid');

exports.process = async (request, response) => {
  console.log('[ORDER SERVICE] Creating order');

  const request_data = JSON.parse(request.body);

  const order = {
    id: uuid(),
    ...request_data
  };

  console.log(`[ORDER SERVICE] Created order: ${order.id}`);

  response.body = JSON.stringify(order);
  response.statusCode = 201;
  return response;
};
Python examples will be added soon.
Go examples will be added soon.
Rust examples will be added soon.
Finally we will emit an order_placed event allowing the payment service to continue processing the workflow. Let's publish the order payload to the order_placed topic.
- Node.js
- Python
- Go
- Rust
const { v4: uuid } = require('uuid');
const { topics } = require('@chuva.io/less');

exports.process = async (request, response) => {
  console.log('[ORDER SERVICE] Creating order');

  const request_data = JSON.parse(request.body);

  const order = {
    id: uuid(),
    ...request_data
  };

  console.log(`[ORDER SERVICE] Created order: ${order.id}`);
  await topics.order_placed.publish(order);

  response.body = JSON.stringify(order);
  response.statusCode = 201;
  return response;
};
Python examples will be added soon.
Go examples will be added soon.
Rust examples will be added soon.
If a tree falls and no one hears it, does it make a sound? 🙉
2. Process the order_placed event in the Payment microservice.
Now that we are able to create orders and we have published our event, let's process it in the payment service.
I will not actually be separating the deployments, in other words, creating microservices here. I think Less makes it easy enough to organize and discover the available topics by just looking at the root of the /less/topics folder and using prefixes for what can later become a separate microservices (E.g. /topics/orders_* or /topics/payments_*). With Less, refactoring Payments into a microservice, for example, would be very simple.
Check out the Cross-Application Topics documentation to learn how subscribe to topics from different microservices.
Since Less is serverless, in terms of performance there is no tradeoff with this decision.
Let's create our order_placed topic and payment_service_process_payment subscriber.
- Node.js
- Python
- Go
- Rust
less-cli create topic --name order_placed --subscribers payment_service_process_payment --language js
# File created: less/topics/order_placed/payment_service_process_payment/index.js
exports.process = async (order) => {
  console.log(`[PAYMENT SERVICE] Processing payment for order: ${order.id}`);
  // Process payment...
  console.log(`[PAYMENT SERVICE] Payment succeeded for order: ${order.id}`);
};
Python examples will be added soon.
Go examples will be added soon.
Rust examples will be added soon.
Once we finish processing our payment we should emit a payment_success event.
- Node.js
- Python
- Go
- Rust
const { topics } = require('@chuva.io/less');

exports.process = async (order) => {
  console.log(`[PAYMENT SERVICE] Processing payment for order: ${order.id}`);
  // Process payment...
  console.log(`[PAYMENT SERVICE] Payment succeeded for order: ${order.id}`);
  await topics.payment_success.publish(order);
};
Python examples will be added soon.
Go examples will be added soon.
Rust examples will be added soon.
3. Process the payment_success event in the Restaurant microservice.
Once a payment is successful, the Restaurant microservice continues the workflow by confirming the food order and publishing the restaurant_confirmed_order event.
Let's process the payment_success event by creating the restaurant_service_confirm_order topic subscriber.
- Node.js
- Python
- Go
- Rust
less-cli create topic --name payment_success --subscribers restaurant_service_confirm_order --language js
# File created: less/topics/payment_success/restaurant_service_confirm_order/index.js
exports.process = async (order) => {
  console.log(`[RESTAURANT SERVICE] Confirming order: ${order.id}`);
  // Confirm order...
  console.log(`[RESTAURANT SERVICE] Order confirmed: ${order.id}`);
};
Python examples will be added soon.
Go examples will be added soon.
Rust examples will be added soon.
Once we confirm our order we should emit the restaurant_confirmed_order event.
- Node.js
- Python
- Go
- Rust
const { topics } = require('@chuva.io/less');

exports.process = async (order) => {
  console.log(`[RESTAURANT SERVICE] Confirming order: ${order.id}`);
  // Confirm order...
  console.log(`[RESTAURANT SERVICE] Order confirmed: ${order.id}`);
  await topics.restaurant_confirmed_order.publish(order);
};
Python examples will be added soon.
Go examples will be added soon.
Rust examples will be added soon.
4. Process the restaurant_confirmed_order event in the Order, Notification, Delivery Partner, and Loyalty microservices.
Let's quickly create our 4 topic subscribers and their processors.
- Node.js
- Python
- Go
- Rust
less-cli create topic --name restaurant_confirmed_order --subscribers order_service_update_order_status notification_service_notify_user delivery_partner_service_assign_delivery_partner loyalty_service_add_loyalty_points --language js
# File created: less/topics/restaurant_confirmed_order/order_service_update_order_status/index.js
# File created: less/topics/restaurant_confirmed_order/notification_service_notify_user/index.js
# File created: less/topics/restaurant_confirmed_order/delivery_partner_service_assign_delivery_partner/index.js
# File created: less/topics/restaurant_confirmed_order/loyalty_service_add_loyalty_points/index.js
exports.process = async (order) => {
  console.log(`[ORDER SERVICE] Updating order confirmation success status: ${order.id}`);
  // Update order...
  console.log(`[ORDER SERVICE] Updated order confirmation success status: ${order.id}`);
};
exports.process = async (order) => {
  console.log(`[NOTIFICATION SERVICE] Emailing customer of order success: ${order.id}`);
  // Email customer...
  console.log(`[NOTIFICATION SERVICE] Emailed customer of order success: ${order.id}`);
};
exports.process = async (order) => {
  console.log(`[DELIVERY PARTNER SERVICE] Assigning delivery partner: ${order.id}`);
  // Assign delivery partner...
  console.log(`[DELIVERY PARTNER SERVICE] Delivery partner assigned: ${order.id}`);
};
exports.process = async (order) => {
  console.log(`[LOYALTY SERVICE] Adding points to wallet: ${order.id}`);
  // Add points to wallet...
  console.log(`[LOYALTY SERVICE] Added points to wallet: ${order.id}`);
};
Python examples will be added soon.
Go examples will be added soon.
Rust examples will be added soon.
5. Publish the delivery_partner_assigned event.
Let's make a small update to our /topics/restaurant_confirmed_order/delivery_partner_service_assign_delivery_partner topic and publish the delivery_partner_assigned event.
- Node.js
- Python
- Go
- Rust
const { topics } = require('@chuva.io/less');

exports.process = async (order) => {
  console.log(`[DELIVERY PARTNER SERVICE] Assigning delivery partner: ${order.id}`);
  // Assign delivery partner...
  console.log(`[DELIVERY PARTNER SERVICE] Delivery partner assigned: ${order.id}`);
  await topics.delivery_partner_assigned.publish(order);
};
Python examples will be added soon.
Go examples will be added soon.
Rust examples will be added soon.
6. Process the delivery_partner_assigned event in the Order and Notification microservices.
Let's create 2 more processors, this time for the delivery_partner_assigned topic.
- Node.js
- Python
- Go
- Rust
less-cli create topic --name delivery_partner_assigned --subscribers order_service_update_order_status notification_service_notify_user --language js
# File created: less/topics/delivery_partner_assigned/order_service_update_order_status/index.js
# File created: less/topics/delivery_partner_assigned/notification_service_notify_user/index.js
exports.process = async (order) => {
  console.log(`[ORDER SERVICE] Update delivery status: ${order.id}`);
  // Update delivery status...
  console.log(`[ORDER SERVICE] Updated delivery status: ${order.id}`);
};
exports.process = async (order) => {
  console.log(`[NOTIFICATION SERVICE] Emailing customer of delivery partner assignment: ${order.id}`);
  // Email customer...
  console.log(`[NOTIFICATION SERVICE] Emailed customer of delivery partner assignment: ${order.id}`);
};
Python examples will be added soon.
Go examples will be added soon.
Rust examples will be added soon.
Up until now we have seen how easy it is to handle success cases between our services, as well as express our system, using Less.
So far we have a project with the following structure:
─ less
  └─ apis
     └─ orders
        └─ orders
  └─ topics
     └─ order_placed
        └─ payment_service_process_payment
     └─ payment_success
        └─ restaurant_service_confirm_order
     └─ restaurant_confirmed_order
        └─ order_service_update_order_status
        └─ notification_service_notify_user
        └─ delivery_partner_service_assign_delivery_partner
        └─ loyalty_service_add_loyalty_points
     └─ delivery_partner_assigned
        └─ order_service_update_order_status
        └─ notification_service_notify_user
Compare our folder structure to our system diagram and you will see that going from a system's architectural design to a live implementation is super easy with Less.
Handling errors
That was easy! Now let's move on to the error case in which the order could not be processed by the Restaurant microservice and the payment needs to be refunded.
Here is a diagram of the error case:
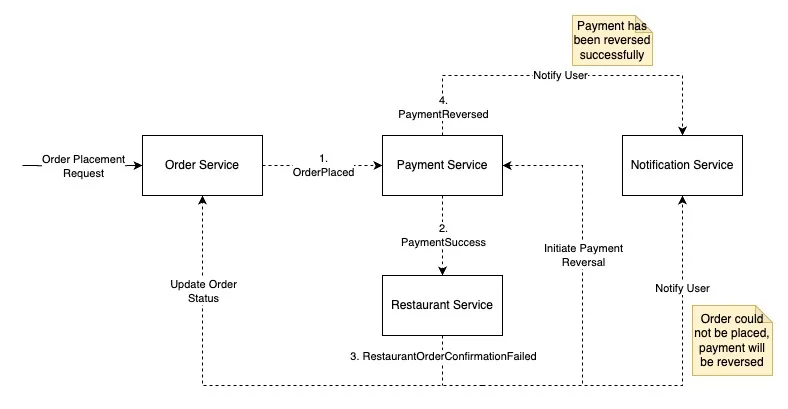
Starting from point 3 of the error section of Waswani's article let's see how we can easily handle errors with Less as well.
3. Publish a restaurant_order_confirmation_failed upon failure.
Let's randomly make our Restaurant service fail to process some orders by updating our topics/payment_success/restaurant_service_confirm_order topic processor.
First we'll create a function that will throw an error 50% of the time.
- Node.js
- Python
- Go
- Rust
const confirm_order = (order) => {
  const success = Math.floor(Math.random() * 2) + 1
  if (success === 1) {
    throw new Error(`Failed to confirm order: ${order.id}`);
  }
};

exports.process = async (order) => {
  console.log(`[RESTAURANT SERVICE] Confirming order: ${order.id}`);
  // Confirm order...
  console.log(`[RESTAURANT SERVICE] Order confirmed: ${order.id}`);
};
Python examples will be added soon.
Go examples will be added soon.
Rust examples will be added soon.
Now let's update our code to add our amazing order confirmation implementation.
- Node.js
- Python
- Go
- Rust
const confirm_order = (order) => {
  const success = Math.floor(Math.random() * 2) + 1
  if (success === 1) {
    throw new Error(`Failed to confirm order: ${order.id}`);
  }
};

exports.process = async (order) => {
  console.log(`[RESTAURANT SERVICE] Confirming order: ${order.id}`);
  // Confirm order...
  try {
    confirm_order(order);
  } catch (error) {
    console.log(`[RESTAURANT SERVICE] Failed to confirm order: ${order.id}`);
    return;
  }
  console.log(`[RESTAURANT SERVICE] Order confirmed: ${order.id}`);
};
Python examples will be added soon.
Go examples will be added soon.
Rust examples will be added soon.
Here we are failing gracefully but if we wanted to take advantage of Less's fault tolerance we could have just let the function crash or thrown an exception and Less would continue to replay the message until it succeeds or expires.
See the Handling Failing Messages documentation to learn more about fault tolerance in Less.
4. Process the restaurant_order_confirmation_failed event in the Payment, Notification, and Order microservices.
Let's update our code to publish the failed order to the restaurant_order_confirmation_failed topic.
- Node.js
- Python
- Go
- Rust
less-cli create topic --name restaurant_order_confirmation_failed --language js
# Folder created: less/topics/restaurant_order_confirmation_failed
const { topics } = require('@chuva.io/less');

const confirm_order = (order) => {
  const success = Math.floor(Math.random() * 2) + 1
  if (success === 1) {
    throw new Error(`Failed to confirm order: ${order.id}`);
  }
};

exports.process = async (order) => {
  console.log(`[RESTAURANT SERVICE] Confirming order: ${order.id}`);
  // Confirm order...
  try {
    confirm_order(order);
  } catch (error) {
    console.log(`[RESTAURANT SERVICE] Failed to confirm order: ${order.id}`);
    await topics.restaurant_order_confirmation_failed.publish(order);
    return;
  }
  console.log(`[RESTAURANT SERVICE] Order confirmed: ${order.id}`);
};
Python examples will be added soon.
Go examples will be added soon.
Rust examples will be added soon.
Now let's create the restaurant_order_confirmation_failed topic and its processors in each of the Payment, Notification, and Order services.
- Node.js
- Python
- Go
- Rust
less-cli create topic --name restaurant_order_confirmation_failed --subscribers payment_service_initiate_payment_reversal notification_service_notify_user order_service_update_order_status --language js
# File created: less/topics/restaurant_order_confirmation_failed/payment_service_initiate_payment_reversal/index.js
# File created: less/topics/restaurant_order_confirmation_failed/notification_service_notify_user/index.js
# File created: less/topics/restaurant_order_confirmation_failed/order_service_update_order_status/index.js
exports.process = async (order) => {
  console.log(`[PAYMENT SERVICE] Refunding payment for order: ${order.id}`);
  // Refund payment...
  console.log(`[PAYMENT SERVICE] Refunded succeeded for order: ${order.id}`);
};
exports.process = async (order) => {
  console.log(`[NOTIFICATION SERVICE] Emailing customer of order cancellation: ${order.id}`);
  // Email customer...
  console.log(`[NOTIFICATION SERVICE] Emailed customer of order cancellation: ${order.id}`);
};
exports.process = async (order) => {
  console.log(`[ORDER SERVICE] Updating order cancellation status: ${order.id}`);
  // Update order...
  console.log(`[ORDER SERVICE] Updated order cancellation status: ${order.id}`);
};
Python examples will be added soon.
Go examples will be added soon.
Rust examples will be added soon.
5. Publish a payment_reversed event from the Payment microservice.
Let's update the restaurant_order_confirmation_failed/payment_service_initiate_payment_reversal processor to emit a payment_reversed event.
- Node.js
- Python
- Go
- Rust
const { topics } = require('@chuva.io/less');

exports.process = async (order) => {
  console.log(`[PAYMENT SERVICE] Refunding payment for order: ${order.id}`);
  // Refund payment...
  console.log(`[PAYMENT SERVICE] Refunded succeeded for order: ${order.id}`);
  await topics.payment_reversed.publish(order);
};
Python examples will be added soon.
Go examples will be added soon.
Rust examples will be added soon.
6. Process the payment_reversed event in the Notification microservice.
Let's process our final event and finish building our system.
First we need our topic and processor.
- Node.js
- Python
- Go
- Rust
less-cli create topic --name payment_reversed --subscribers notification_service_notify_user --language js
# File created: less/topics/payment_reversed/notification_service_notify_user/index.js
exports.process = async (order) => {
  console.log(`[NOTIFICATION SERVICE] Emailing customer of payment reversal: ${order.id}`);
  // Email customer...
  console.log(`[NOTIFICATION SERVICE] Emailed customer of payment reversal: ${order.id}`);
};
Python examples will be added soon.
Go examples will be added soon.
Rust examples will be added soon.
Final project structure
Our final project structure looks like this:
─ less
  └─ apis
     └─ orders
        └─ orders
  └─ topics
     └─ order_placed
        └─ payment_service_process_payment
     └─ payment_success
        └─ restaurant_service_confirm_order
     └─ restaurant_confirmed_order
        └─ order_service_update_order_status
        └─ notification_service_notify_user
        └─ delivery_partner_service_assign_delivery_partner
        └─ loyalty_service_add_loyalty_points
     └─ delivery_partner_assigned
        └─ order_service_update_order_status
        └─ notification_service_notify_user
     └─ restaurant_order_confirmation_failed
        └─ order_service_update_order_status
        └─ notification_service_notify_user
        └─ payment_service_initiate_payment_reversal
     └─ payment_reversed
        └─ notification_service_notify_user
Let's look at the additions made in comparison with the error diagram:
Just imagine for a second — someone wants to understand how the overall workflow is implemented and what are the possible alternate paths and error conditions within the workflow. It would be simply crazy :)
- Naresh Waswani
When using Less I actually find it quite easy to understand how the overall system is architected, mitigating a large part of the disadvantages outlined in Waswani's article.
Deploy your system
Finally we can deploy our system and test our POST /orders route to see our system in action.
- npx
- npm
- yarn
npx @chuva.io/less-cli deploy choreography-coordination-pattern
npm i -g @chuva.io/less-cli
less-cli deploy food-delivery-system
yarn global add @chuva.io/less-cli
less-cli deploy food-delivery-system
See the Less Logs documentation to learn how how to monitor your function logs.
I appreciate you reading along! Reach out to me on Linkedin with any comments or if you would like to talk about Less, microservices, or anything else!